Sunday, May 28, 2017

DT Deni - All About Mum

Hello lovely followers,

Well the month of May is beginning to wind down, I can't believe how fast this month has gone!

I have had a lot of personal stuff going on this past month, including lots of Wedding Planning and also resigning from my day job this week ready for a fresh start elsewhere.

The Month of May to us is all about our Mum's and the Motherly figures in our lives. I am very lucky to have an awesome Mum and a fantastic Mother in Law to be.

I created this card with two sisters in mind to give their Mum, the image just made me think of two sisters hugging.


I started off by stamping the image - "Stamping Bella Huggy Squidgies" using a Lawn Fawn Acrylic Block and Memento Tuxedo Black and used Mondi Color Copy for my blending cardstock.

I then cut it out on my Sizzix Big Shot using a Lawn Fawn Stitched Circle die (i'm not sure if it was from the small or large set as mine are all in the same package).

It was then time to go and find some patterned papers, I used a 6x6 Paper pad from Crate Paper, there is no name on the pad but there is a number #680203. I was nearly finished this paper pad so I only had a few papers to use but I made it work.

I used a Lawn Fawn Stitched Square die (unsure if it was a small or large as again these are all packaged together) to cut one of the sheets of patterned paper using my Sizzix Big Shot.

I cut the black matting using Canson Cardstock on my Cutterpillar Pro. I cut the bird patterned paper to size and attached it to the black matting. I cut the strip using leftovers, the Loopy border is from La La Land Crafts August 2015 Stamp Club Kit (no long available), you can purchase this separately now (links below).


I used Lawn Fawn "Mom + Me" Stamp set to stamp the sentiment. I used my Embossing Buddy to prep the canon cardstock strip first, I then used Versamark Watermark stamp pad to stamp the sentiment and applied Ranger Superfine Embossing Powder in White, I then grabbed my Heat Tool to melt the embossing powder.

All layers were then adhered together using Scotch ATG and Tombow Mono Multi (I switch between the two for different layers). I then adhered all the layers down onto a Pre-made Twiddleybitz Card Base.

Once I thought the card was completed I decided something was missing, so I used the Lawn Fawn "Mom + Me" Stamp set to stamp the grass and the butterflies. I used My Favorite Things Hybrid Ink in Sour Apple, Razzle Berry and Lemon Drop. I then added At You Spica - Clear over the butterflies and the girls shoes.


Copic Markers Used

E000, E00, E21, E11, E04, R11
RV11, RV13, RV14
Y32, Y35
E55, E57, E59
E35, E37, E39
W00, W2
N0, N3

Products Used

Stamping Bella - Huggy Squidgies
Lawn Fawn - Mom + Me
La La Land Crafts - August 2015 Stamp Club Kit
La La Land Crafts - Loopy Border Die
Crate Paper - 6x6 Pad #680203
My Favorite Things - Hybrid Ink Sour Apple
My Favorite Things - Hybrid Ink Razzle Berry
My Favorite Things - Hybrid Ink Lemon Drop
Versamark - Watermark Stamp Pad
Ranger - Super Fine Embossing Powder White
Memento Tuxedo Black
Canson Cardstock - Black
Lawn Fawn - Acrylic Block
Sizzix Big Shot
Tombow Mono Multi Liquid Adhesive
Scotch ATG
Mondi Color Copy
Cutterpillar Pro
At You Spica - Clear
EK Success - Powder Tool
Lawn Fawn - Stitched Circles
Lawn Fawn - Stitched Squares
Twiddleybitz Cardbase
Thursday, May 25, 2017

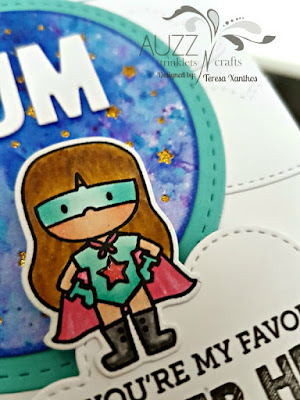
DT Teresa - Mother's Day 2

Hello Everyone!

Mother's Day may now be behind us for 2017, but we can honour and celebrate mums every day and any day! 

This card uses Neenah Classic Crest 110lb Smooth Solar White Cardstock for the base which is cut with a paper trimmer at 4 1/4" x 11" and scored with a teflon bone folder at 5 1/2" to make a top folding card of 5 1/2" x 4 1/4".


I cut the cloud dies from Mama Elephant Stitched Sky with the Sizzix Big Shot Machine to create a background on the base of the card with Neenah Classic Crest 80lb Smooth Solar White Cardstock. I adhered them to the card using Kokuyo Glue Tape Roller and then used scissors to cut the over hanging areas of cloud from the card base. 

I coloured a piece of Strathmore Bristol Smooth Paper using Colourcraft Brusho Colours in Ultramarine. I first sprayed the piece with water from a Tim Holtz Distress Sprayer and then sprinkled the Brusho powder over the wet paper. The colour spread across the piece beautifully and I then proceeded to dry the paper with a Wagner Heat Tool. Once dry, I die cut the stars circle using both dies from My Favorite Things Starry Circle and adhered a piece of gold glitter cardstock behind the piece to create shiny bright stars. I added some colour around the outside of the circle using Tim Holtz BluePrint Sketch Distress Ink with a Ranger Ink Blending Tool and Foam I placed this onto a larger die cut circle from Lil' Inker Designs Stitched Mats: Circles and adhered it onto the card front with the Kokuyo Glue Tape Roller.  


I stamped the sentiment with My Favorite Things Black Licorice Hybrid Ink from Mama Elephant Tiny Heroes onto an extra die cut cloud and popped it in place with doubled-up 3M Scotch Foam Tape for dimension. I love this sentiment, even if the word 'favourite' is spelt incorrectly! ;) 

The focal image for this card is also from Mama Elephant Tiny Heroes, stamped in Memento Tuxedo Ink and cut with the co-ordinating dies, Mama Elephant Tiny Heroes Creative Cuts. She is coloured with Copic markers and adhered with foam tape also. I added a splash of Zig A Wink of Stella, Clear and dropped a tiny dollop of Ranger Glossy Accents over the star on her chest.


I then added MUM to the card using dies from Lawn Fawn Cole's ABCs, completing the card.


Thankyou for following along with me today. Please feel free to ask questions if anything needs clarifying. If you cannot find the items I have used (listed below) in the Auzz Trinklets and Crafts store, be sure to drop Neha a message via email or Facebook and she will do what she can to order the product in for you.

Happy crafting and have a great day!


Teresa


Products used:

Neenah Classic Crest 110lb Smooth Solar White Cardstock
Paper trimmer
Teflon bone folder
Mama Elephant Stitched Sky
Sizzix Big Shot Machine
Neenah Classic Crest 80lb Smooth Solar White Cardstock
Kokuyo Glue Tape Roller
Strathmore Bristol Smooth Paper
Colourcraft Brusho Colours in Ultramarine
Tim Holtz Distress Sprayer
Wagner Heat Tool
My Favorite Things Starry Circle
Lil' Inker Designs Stitched Mats: Circles
Kokuyo Glue Tape Roller
Copic markers
BG11, BG13, E00, E11, E43, E44, E47, E95, 
N0, N4, N7, R20, RV25, Y26
3M Scotch Foam Tape
Zig Wink of Stella, Clear
Lawn Fawn Cole's ABCs


Friday, May 19, 2017

DT Clarinda - Mothers Day painting

Hello everyone,

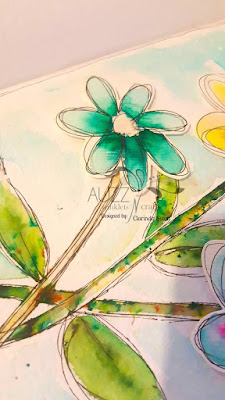
This is my second post for this month's theme of - Mothers Day. I have chosen to share with you a page from my art journal in honour of my mum! You may have noticed that I am doing a lot of watercolour painting at the moment. I really, really love painting with watercolours over all other media. I love how messy it looks yet still looks great and I love how they blend yet keep their colours if it's done right, and I also love how quick it is! I have spent many hours with my copic markers, and I still love how it looks, but it takes soooo long, lol. Anyway I hope you enjoy this post.

Here is a sneak peak of the finished page:


And here is a picture of the items I used to create this page. The items include watercolour paper; adhesive foam strips (but you can use any adhesive foam); two water pens - one fine tip and one wide tip; one fine tip black pen - archival is best; brushos in lime green and olive green; Nuance powdered inks (very similar to brushos but much smaller *sad face*); liquid glitter glue - crystalina; and Koh-I-Noor solid watercolour paints. 


Below is a better photo of the Koh-I-Noor solid watercolour paints. I own a lot of different paints, and these were the cheapest out of them all. As you can see I have two sets, the ones in the black casing and the white casing and they both have different colours. I love them as they twist together for easy storage and for such a cheap paint they blend beautifully and have a great range of colours and are quite pigmented. I made myself a cheat sheet of colours for each tray as the colours can be deceiving in the tray.  


Anyway, this painting began as a scribble on some left over watercolour paper. I was just doodling flowers, so I decided to paint them. The flowers are painted using a wet on wet technique using the watercolours above and the watercolour pen with the wide tip. I then drew and painted the hearts using the Nuance powders. I just sprinkled some onto the pre wetted paper. You can use a fine tip water pen to move the water around to help with blending if you are after a certain look. I let them dry and then cut them out. I then placed them on a blank page in my journal to see where I would like them and placed a dot around where the top of each stem would need to be. Once I doodled the stem and leaves I wet brushed them and sprinkled them with the brusho's. I love the look they give with the multi colour speckles. I purposely did not blend them because I wanted that look. Once dry I wet washed the background and used foam adhesive to attach the flowers and hearts so they sit up off the page.... oh and I added cystalina glue to the center of each flower for a touch of bling.


I hope you enjoy my painting :)
Till next time

Clarinda xx


Tuesday, May 16, 2017

Mothers day

Hello,
I hope you all enjoyed a wonderful Mothers Day.
Its Tracey back with you........Our theme for the month of may is Mothers day. I've created a layout with a beautiful photo of my Mother.


I've kept the colours very soft ....tone on tone ,  a mix of lemon , cream and green. I did not want the embellishments to take away from the photo!
A simple layout with lots of layering of pretty papers! 


The small flowers were created using Memory Box die - Cherry Blossom. The three large lemon flowers, leaves and sentiment (which is hard to see in the photo ) were created using Altenew Dahlia blosssoms. I also used the coordinating dies to cut the flowers and leaves.The sentiment reads..."Live Life in full Bloom"

Thanks for stopping by...happy crafting!


Sunday, May 14, 2017

May - Mother's Day DT Deni

Good Morning All,

With the month of May hitting its middle, we are enjoying celebrating our Mum's and Mum figures throughout the entire month.

I have created a card for a Special Mum using a stamp set from Newton's Nook called Raccoon Rascals, I thought about thinking outside the box instead of the usual flower image cards.


I stamped the image onto Mondi Color Copy (you can use X-Press it blending card or anything else Copic friendly), which is my go to Copic Paper using Memento Tuxedo Black and a Lawn Fawn Acrylic Block.

I fussy cut the image using Cutterbee Scissors, and inked around the edge using a double ended Tombow marker.

I stamped the word "Mum" using Lawn Fawn Jessie's ABC's and Memento Tuxedo Black.

I then started thinking about my card layout.. I found an almost finished paper pad in my stash from Prima called Bohemian Bamboo (an old stock item from Auzz Trinklets) and some thin cardboard which was from some packaging, i cut this up into a few sizes and started putting those layers together using Scotch ATG.

Next i decided i was going to add a big circle to my card using Lawn Fawn Stitched Circle dies, i attached the Raccoon's using Tombow Mono Multi Liquid Adhesive, then stamped the sentiment using MFT Simply Fab Sayings, I stamped this in my Misti as i knew because of the layers i would need to re-stamp the sentiment.

I added some Nuvo Drops to finish the card off and that's it ;-)

Thanks For stopping by and we hope to see you again soon.

Deni

Wednesday, May 10, 2017

DT Teresa - Mother's Day

Hello Everyone!

Today I am sharing a cheerful card for Mother's Day, our theme for the month of May.

This card uses Neenah Classic Crest 110lb Smooth Solar White Cardstock for the base which is cut with a paper trimmer at 4 1/4" x 11" and scored with a teflon bone folder at 5 1/2" to make a top folding card of 5 1/2" x 4 1/4".


I stamped the Simon Says Stamp Circle Doodle Background in Versamark Ink onto a piece of  5 1/2" x 4 1/4" Strathmore Bristol Cardstock after using the EK Tools Powder Tool to guard against stray embossing powder. I then covered the stamped background with Ranger Clear Embossing Powder and heat set the powder with a Wagner Heat Tool

I then chose colours of the rainbow from my collection of Zig Clean Color Real Brush Markers and painted the rings of the circles on the card in ROYGBIV (red, orange, yellow, green, blue, indigo, violet) order and I threw pink in there too, for good measure! I lay down a small amount of each colour in a ring and then blended out the colour using a Zig Wink of Stella Brush Marker which created a shimmer all over the card. The shine of the embossing powder and shimmer on the colour looks beautiful, but difficult to capture in a photograph.


I die cut butterflies using Pretty Pink Posh Blissful Butterflies Coordinating Dies from the coloured cardstock, once it had dried and with the same die I also cut some butterflies from a black foam sheet using the Sizzix Big Shot Machine. I allowed the foam cut butterflies sit over night to allow them to bounce back into shape after being compressed in the Bigshot Machine before adhering them to the bottom of the coloured butterflies with Ranger Multi Medium Matte.

I cut a triangle away from the coloured piece and adhered it with Kokuyo Glue Tape Roller to the bottom of the left hand side of the card front and cut a strip of Simon Says Stamp Cardstock in Doll Pink and two thin black cardstock strips to run down the length of the triangle. On to the pink strip, I stamped the sentiment from Clearly Besotted Message Me in Versamark Ink and embossed it with Ranger Embossing Powder, White and placed the three strips on to the card front using Ranger Multi Medium Matte. I placed Auzz Trinklets N Crafts Dew Drops 6mm on either side of the sentiment, again using Ranger Multi Medium Matte, which is not at all visible under the clear domes once it has dried. The foam-raised butterflies were then placed onto the card front. 


To complete the card, I cut black cardstock into a card front-sized rectangle from My Favorite Things Blueprints 16 with the Sizzix Bigshot and then lay the rectangle die from My Favorite Things Blueprints 13, ensuring it was centred onto the larger die cut rectangle and ran it through the Bigshot once again. This left me with a narrow frame which I glued onto the card as a finishing touch.


Thankyou for following along with me today. Please feel free to ask questions if anything needs clarifying. If you cannot find the items I have used (listed below) in the Auzz Trinklets and Crafts store, be sure to drop Neha a message via email or Facebook and she will do what she can to order the product in for you.

Happy crafting and have a great day!


Teresa


Products used:

Neenah Classic Crest 110lb Smooth Solar White Cardstock
Paper trimmer
Teflon bone folder
Simon Says Stamp Circle Doodle Background
Versamark Ink
Strathmore Bristol Cardstock
EK Tools Powder Tool
Ranger Embossing Powder, Clear
Wagner Heat Tool
Zig Clean Color Real Brush Markers, 60 pack
   No. 022 Carmine Red
   No. 070 Orange
   No. 050 Yellow
   No. 041 Light Green
   No. 031 Cobalt Blue
   No. 030 Blue
   No. 081 Light Violet
   No. 025 Pink
Zig Wink of Stella Brush Marker
Pretty Pink Posh Blissful Butterflies Coordinating Dies
Black foam sheet
Sizzix Big Shot Machine
Ranger Multi Medium Matte
Kokuyo Glue Tape Roller, Permanent
Simon Says Stamp Cardstock, Doll Pink
Black Cardstock
Clearly Besotted Message Me
Ranger Embossing Powder, White
Auzz Trinklets N Crafts Dew Drops, 6mm
My Favorite Things Blueprints 16
My Favorite Things Blueprints 13

Saturday, May 6, 2017

DT Ness April catch up - Shabby

Hi all,

DT Ness back again with my projects for April....I know its May but who expects me to be organised and on time....anyway our theme for this month was "shabby"....

the first project was 2 small burlap canvases, the 2nd project was a shabby card....thanks for looking and hope u enjoy my take on shabby...not a style I usually do, but really enjoyed the challenge.


Ness xxx.

Friday, May 5, 2017

DT Clarinda - Mothers Day card - ssshhhh don't tell

Hi peeps,

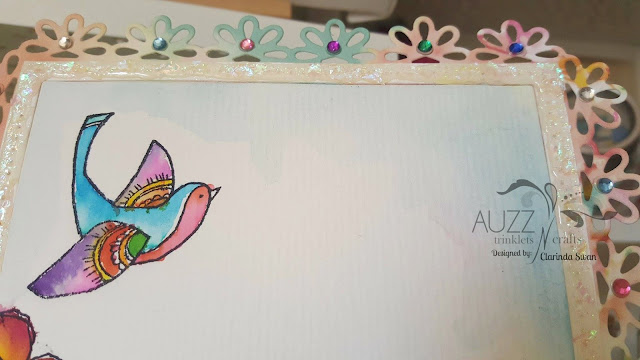
This time I have what I think is a gorgeous card for Mothers Day. I have used watercolour paint to paint in an inked image. It was fairly simple but I love the finish it gives and the messy way it looks. I hope you enjoy it.


I began by cutting out the outside frame using Spellbinders dies - Triple floral using the largest die, I cut this from a piece of cardstock (with a print on the other side) and then sprayed with Lindy's sprays in various colours to give a watercolour look. Once that was dry, I used glossy accents to adhere small bling gems to the centre of each flower.


I then cut the inner two pieces of watercolour cardstock using the next die down in the set. the inner square frame I covered in crystallina glitter glue and used that to stick down pieces of Stampendous Frantage Shaved Ice to give that holographic look. Once that was dry I covered the entire square frame in glossy accents so that it has a glass appearance.


The stamps were stamped onto watercolour cardstock using archival ink. The stamp set I used was Happy Birds by CTMH. I then painted them using Kuretake Gansai Tambi watercolour pigments using a 'wet in wet' watercolour technique to ensure the colours bled into each other.
Once the front was complete I used a Spellbinders Labels 4 die to cut the shape for the inside sentiment.


If you have any questions please feel free to ask.
Until next time.
Clarinda xx

Thursday, May 4, 2017

Happy Mothers Day

Hey Everyone,
 Its Tracey back with you to share my first project for the Month of May........Our Theme is Mothers Day.

My Mum loves the colour orange.......I created this card for her using 'Altenew Brush Art Floral'
 I used chalk inks to stamp the flowers and leaves. The heart shape card was die cut with my cricut using 'Lifes a Party' cartridge. I used foam to mount the top layer to the card for added dimension.
 A splatter of gold colour shine and a few sequins.
More flowers inside. 
I've had this stamp for ages.....I'm using here for the first time. I really like the shape of the flowers! I think you are going to see it a lot more😊

Happy Creating
Tracey

Wednesday, May 3, 2017

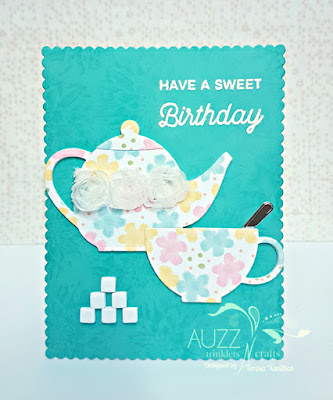
DT Teresa - Shabby Chic 2

Hello! 

I have another shabby chic project to share with you today, catching up now! 

This card uses Neenah Classic Crest 110lb Smooth Solar White Cardstock for the base which is cut with a paper trimmer at 4 1/4" x 11" and scored with a teflon bone folder at 5 1/2" to make a top folding card of 5 1/2" x 4 1/4".

I used the scalloped frame from My Favorite Things Blueprints 20 to place on the card base, moving it slightly above the fold of the card to create a top folding scalloped base card once it was run through the Sizzix Bigshot. I then used the same frame die to cut a piece from Simon Says Stamp cardstock in Audrey Blue and adhered this to the partially scalloped card base. This covered the top fold of the card base - as the frame die was moved above the card base before cutting to retain the fold, the edge was flat. Using the coloured cardstock allowed the opportunity for a complete scalloped card front. Using Versamark Ink, I stamped a floral image from The Ton Fresh Cut Dahlias stamp set numerous times onto the card, providing a subtle background.


I used Neenah Classic Crest 80lb Smooth Solar White Cardstock and stamped various images from Hero arts Color Layering Bird and Branch and WPlus9 Fresh Cut Florals to create my own patterned cardstock piece. Altenew Inks provided a wonderful feminine, pastel pallet using Frosty Pink, Buttercream, Frayed Leaf and Peach Perfect. From this I cut a teapot, teapot lid and teacup from My Favorite Things Dienamics Tea Party and placed aside. 

I then die cut multiple (7-8) tea pots, lids, teacups and (42-48) sugar cubes with the dies from plain white cardstock and adhered the pieces together using Ranger Multi Medium Matte to make sturdy embellishments. Before adding the top stamped piece of the tea pot lid and tea cup I cut away a small area of the plain adhered pieces with my Tim Holtz scissors to allow the pieces to sit flush over the top of the teapot. I then added the top piece and glued the teapot, lid, cup and sugar cubes into place using Ranger Ink Multi Medium Matte.


After brushing over the area to be stamped with an EK Tools powder tool, the sentiment stamp from My Favorite Things Cookie Crumbs was cut apart and stamped in Versamark Ink with my MISTI stamping tool. I used Hero Arts white embossing powder for a stand out sentiment, paired with a Wagner Heat Tool.

I die cut a spoon with My Favorite Things Dienamics Tea Party from a silver foiled piece a had previously made from Heidi Swapp Minc Reactive Foil using a Heidi Swapp Minc Machine. I cut away the lower half of the spoon and placed the handle section against the top of the teacup, adhering it to the card base and giving the illusion of it sitting inside the cup.

The sugar cubes were then swiped with the wonderful Zig Wink of Stella in Clear to provide a shimmer and a sparkle! Finally, I placed some lovely fabric flowers onto the teapot. An elegant, feminine card is the result and would make a great Mother's Day card also.


Thankyou for following along with me today. Please feel free to ask questions if anything needs clarifying. If you cannot find the items I have used (listed below) in the Auzz Trinklets and Crafts store, be sure to drop Neha a message via email or Facebook and she will do what she can to order the product in for you.

Happy crafting and have a great day!


Teresa


Products used:

Neenah Classic Crest 110lb Smooth Solar White Cardstock
Paper trimmer
My Favorite Things Blueprints 20
Sizzix Bigshot Machine
Simon Says Stamp cardstock in Audrey Blue
Versamark Ink
Neenah Classic Crest 80lb Smooth Solar White Cardstock
Hero Arts Color Layering Bird and Branch
WPlus9 Fresh Cut Florals
My Favorite Things Cookie Crumbs
Wagner Heat Tool
Heidi Swapp Minc Machine
Zig Wink of Stella in Clear
Fabric flowers

Tuesday, May 2, 2017

DT Teresa - Shabby Chic

Hello!


I want to apologise for not sharing my April projects with you until now. The month was a difficult one for my family as my beautiful mother-in-law sadly passed away, suddenly, and it was not possible to find the time, inclination or energy to craft.

The project I am sharing today is very different from my usual creations. I found myself looking through the Auzz Trinklets and Crafts store for products that hit me with their shabby chic-ness. 


I took a 20cm x 20cm canvas and covered it with Ranger/Dina Wakley Media Gesso in white and allowed it to dry. I have not tried napkin art before, but was keen to give it a go and found the perfect napkin for a shabby chic project - a parisian themed ballerina displayed with a music manuscript - perfect! I separated the layers of the napkin and kept only the top sheet with the image to use on the canvas. I tore away the section of the napkin that I wished to use and carefully cut around the ballerina's legs. I used a PVA glue to adhere the napkin, brushing the glue directly onto the canvas and on top of the image. I would thoroughly recommend using a decoupage glueas it designed specifically for this and I plan to use this in the future. The PVA seemed not quite right for such a delicate paper. Again, I allowed this to dry before continuing with my project.


I love The Crafter's Workshop stencil Mini Cherry Blossoms and I paired this with Ranger Texture Paste, coloured with a few drops of Ranger Distress Ink in Cracked Pistachio. I placed the stencil in the bottom left corner of the canvas and applied the coloured texture paste to bottom half of the stencil. I removed the stencil, cleaned it off with a baby wipe and then moved it to the top right of the canvas and applied more texture paste to the area. Although the stencil is smaller than the canvas, once the middle of the canvas is covered with other items, it gives the illusion that the stencilled image is continuous. This also was given time to dry. (Yes, I needed to be very patient creating this canvas!)


I cut up some small pieces of Burlap Fringe in Sand and adhered these to the canvas with my favourite adhesive, Ranger Multi Medium Matte. My favourite, as it dries clear and leaves no evidence of its presence; no shine, so it doesn't matter if it happens to ooze out from the sides of the object you are adhering.


I then arranged paper flowers onto the canvas that have been in my stash for a considerable length of time, so this was a great opportunity to use them. You can find a beautiful range of flowers in the Auzz Trinklets and Crafts store here


The butterfly wings and Eiffel Tower embellishments were from my stash, as was the frame sticker around the lovely sentiment which comes from the Stampers Anonymous/Tim Holtz stamp set, Urban Chic.

To complete the canvas, I took a sponge finger dauber and applied Tsukineko Golden Glitz ink to the entire canvas, apart from the inside of the framed sentiment.


Thankyou for following along with me today. Please feel free to ask questions if anything needs clarifying. If you cannot find the items I have used (listed below) in the Auzz Trinklets and Crafts store, be sure to drop Neha a message via email or Facebook and she will do what she can to order the product in for you.

Happy crafting and have a great day!


Teresa


Products used:

Canvas 20cm x 20 cm
Ranger Ink/Dina Wakley Media Gesso (white)
Napkin - Ballet Paris
PVA glue
Sospeso Transparente - Decoupage Glue (recommended)
The Crafter's Workshop stencil - Mini Cherry Blossoms
Ranger Ink Texture Paste
Ranger Ink Distress Ink - Cracked Pistachio
Burlap Fringe - Sand
Ranger Ink Multi Medium Matte
Paper Flowers
Embellishments - butterfly wings, Eiffel Tower, frame sticker
Stampers Anonymous/Tim Holtz stamp set - Urban Chic
Tsukineko Sponge Finger Dauber
Tsukineko Golden Glitz ink pad


 photo oldswirl_zps9e8ffa8f.png