Thursday, August 29, 2019

Embossing Folder Cards and Few Backgrounds

Hello Card makers and Bloggers

Its been a long time since I wrote my last blog. Was so busy after my Altenew Educator Program which I cleared in July. Yes you heard me right !! Finally I am a FIRST Australian Certified educator for Altenew . Yahoo!! I am very excited. 

Now coming back to the topic. This time my blog is not about Altenew creation. Or you can say I have used some of the products from Altenew like their inks and sentiments to make few of my cards, but I had few Crafters Companions embossing Folders sitting with me so I though lets get some inspirations and spread some inspiration.

I have also followed Jennifer Mcguire for inspirations.

So here are few of the things I made:


I will try and Explain what I did with each of them one by one.

The one I took the Crafters Compaion Indian Summer 3D Embossing Folder and Altenew inks.


The Next one is the Crafts Companion Floral Fusion Along with Finnabair Metalic wax and Altenew Ink.


This one is just on white with Flourishing Frames 


Trust me this was white paper and I have used crafters Companion Zen Garden , Redesign Wax along with picket fence blending brush


The Next one is my favorite and this Embossing folder is In the Garden 


Spreading some love with Love Blossom 


Now coming onto come cards which I have created 


You can see the cards which I have made are with some of the folders which I have shown above. The Sentiments used on the cards are from Altenew.

Hope you all like it.

Thanks
neha


Saturday, June 29, 2019

Altenew Final Challenge for the completion of Educator Program


Wow! What an amazing Journey I had which I started from July 2018 and now here I am, completed my 25 great tutorials with absolutely amazing teachers from Altenew.

Before I go ahead and share my last Altenew Educator program post, I would firstly like to present a BIG THANK YOU to Virginia Lu and Erum Tasneem, who have been wonderful support throughout my Journey in Altenew Educator Program. They have guided me in every project I submitted, correcting me where ever I was wrong which helped me in just overall improvements. And last but not the least, Thank you to Altenew LLC and their team for giving me this opportunity to enroll myself and improve my work with their products for this Educator Program initiative.

And now back to my project. For my last challenge here are few points which I had to do and keep in mind.

·       Teach a 2-hour class in a classroom or workshop setting
·       There must be 4-10 students in attendance at the workshop.
·       Pre-workshop: planning and details of the workshop.
·       During the workshop: Google Hangout with Altenew team members.
·       Post-Workshop: report of the workshop, classroom projects and reflection on the class.

To fulfill my above requirements I organised my class on 21st June 2019 and 29th June 2019 at my store Auzz Trinklets N Krafts. I gathered few of my regular customers to conduct this Class, where I taught them 3 different types of Card.

Below are the cards which I taught them during the session


Card 1:


Materials for the card used:
  • ·      White base cardstock 8 ½’x 11
  • ·       Black cardstock 4 ¼’ x 5 ½’
  • ·       White cardstock 4’ x 5 ¼’
  • ·       Climbing Clematis Flower and Leaf  stamped die cuts
  • ·       Warm and Cozy , Golden sunset , Pocketful of sunshine and Greenfields Mini ink cubes
  • ·       A piece of vellum
  • ·       Couple of sequins
  • ·       Cozy Flannel Cover Die
  • ·       Coffee Break Mini ink cube set
  • ·       Altenew Antique Gold Pigment Ink pad
  • ·       Black colour from Altenew Watercolour Palette 
  • ·       Splatter Brush
  • ·       Glue, tape and Scissors.
  • ·       Glad Press N Seal
  • ·       Black Permanent Ink Pad
  • ·       MISTI


Focus for the Class:
  • ·       Let it shine : how to put embellishments or bling and Splatter
  • ·       All about layering : how to Layer your flowers and following the guide
  • ·       Partial die cutting; Using your die cover dies in for partial die cutting.


How to Make the Card:
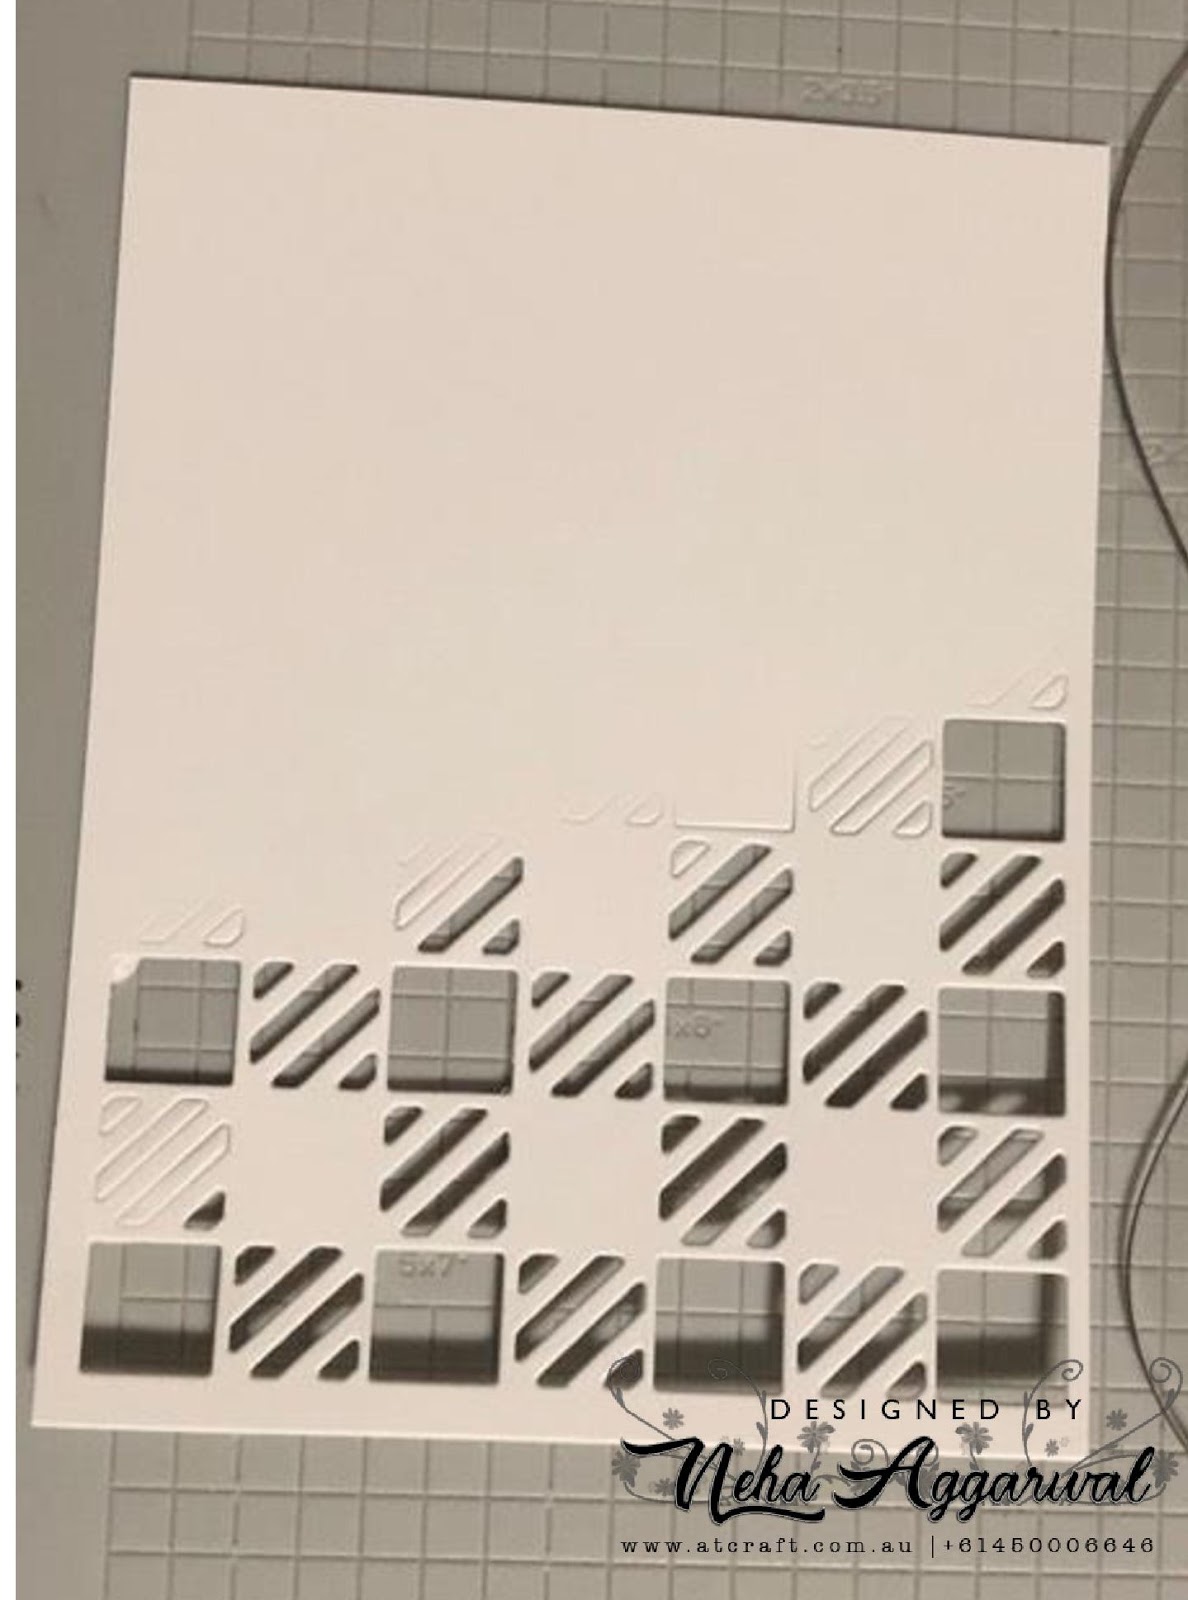
  •   Take a Back piece of cardstock and stick the partial cut cover cardstock which is shown in the picture.

  •  Now splatter few black drops on the partial cover die using the Altenew Watercolour Palette and splatter brush.
  •  I stamp all my flowers and leaf using the layering guide which was provided on the back of the Climbing Clematis stamp. I have used mini ink cubes: warm and cozy, Golden sunset and Pocketful of sunshine for flowers, for leaves I have used Green Field.


  •   Start arranging your flowers as you like. Below I took two ways of arranging them. Once I was satisfied with my arrangement I headed over to my next step.
  • In order to have the same arrangements I used Jennifer Maguire’s Press N Seal technique where I took a piece and stuck that on my layered flowers until they are all temporary stuck on it.
  • Gently removing them from the base I applied glue on the flowers which I wanted to be stuck down and foam tape on the raised flowers and leaves. And then I took it back the way I lifted it, to have it placed the same I initially desired.
  •  I used the sentiments from the same stamp set and stamped in on the Vellum strip and then adhered it on the card base as well keeping in mind the 1/3rd rule.
  • To finish the card I stuck few sequins following the trick of putting them in triangle and also odd numbers which I learned in the class “Let it shine”.
  

 Card 2:


Materials for the card used:
  • White base cardstock 8 ½’x 11
  • White cardstock 4 ¼’ x 5 ½’
  • Shades of Purple Ink pad
  • Spring Bouquet 6 mini Ink cube pads.
  • Black Permanent Ink pad
  • Micron 01 pen
  • A study in Watercolour Stamp set
  • Baby Wipes
  • Altenew Tape runner
  • Altenew Antique Gold Spray
  • Altenew Halftone Hello Stamp
  • Extra piece of Cardstock for masking the area for sentiment.
  • Altenew Evening Grey and morning frost Artist Markers

Focus for the Class:
  • Let it shine : how you can Use Altenew Spays.
  • One Layer Wonder : how to keep your card to Minimal layer and yet they look beautiful
  • Basic masking: Simple masking technique used for sentiment.
  • All about layering: How can solid stamps be layered.


How to Make the Card:
  •   First mask the area which will be used for stamping the sentiment. I had used a piece of rough paper to mask the area.
  •  Now placing my stamps where I needed on the Neenah cardstock 4 ¼’ x 5 ½’ and stamped the different stamps with the inks from Shades of Purple and spring bouquet pink shades. I used two shades from each colour family.

  • First I stamped with the lighter colour. Now daube darker colour on the same stamp ( do not stamp yet) , using baby wipes I took off some of the ink from the sides giving it like a shaded effect and then stamped over the lighter stamped area.
  •   Once I completed my stamping, I removed paper from the masked area and with the help of T ruler I drew two lines with the Micron pen.
  •  I took My Artist maker evening grey first and made scribbles along the top and bottom line where I wanted the sentiments. Then I did the same thing with my Morning frost Artist marker too. (This gave the look of having a paper on top of the base for Sentiment).


  • I also did a little bit of shadow effect on the stamped flower and petals with morning frost Artist marker. I kept in mind my light and shade areas before putting my shadows.


  • Once this was all done I went ahead and stamped the sentiment on the side by using the word “hello” from Halftone Hello.

  •  To finish this card I splattered some Antique Gold from Altenew Spray. While I did this I masked my sentiment again so that I don’t get any gold splatter on my sentiments.


Card 3:


Materials for the card used:
  • White base cardstock 8 ½’x 11
  • black cardstock 4 ¼’ x 5 ½’
  • White cardstock 4’x 5 ¼’
  • Spring Bouquet 6 mini Ink cube pads.
  • Black Permanent Ink pad
  • Picket fence Blending Brush
  • Halftone Thanks stamp and Dies
  • Baby Wipes
  • Altenew Layered Kaleidoscope A & B
  • Few Water drop embellishments
Focus for the Class:
  • Let it shine : how to put embellishments or bling
  • Easy Die cutting: Using dies for stenciling.
  • Clean and Simple Boutique Cards.
  • Easy Ink Blending.

How to Make the Card:


  • Die cut out the Kaleidoscope layer A and B on a thick cardstock as they will be used for stenciling.

  •   Take the white Neenah Card stock 4’ x 5 ¼’ and place your stencil on top of it and position it on your craft mat so that the stencil does not more when doing the blending.
  •  I first used fresh lime Ink pad and then Fusia ink with my respective stencils.


  • Once I was happy with the results I then positioned my dies “Thanks” on the center of the card stock and die cut it out.
  •  I used the “for your thoughtfulness” from the coordinating stamp set and stamped on the white strip.
  •   When I die cut my thanks I managed to save the loose piece which I later on stuck it with the foam tape when I was adhering the rest of my card on the black cardstock.
  • To finish of my card I used few water drops which I had in my stash.


I am so happy for my class for both the days. I was so pleased and thankful to the girls who joined me for the class in learning those three cards. A big thank you to my three coordinators Virginia Lu, Erum and Nicole who gave me their continue support during my both class workshop. I would like to take an opportunity to share few pics of the Workshop which I conducted at my Store.

Pic 1: How I did my preparations for the class. Card Kits

Pic 2: Setup for the Class:

Pic 3: My lovely Students working so hard :

And Final Work from the girls :


Hope you all liked my cards and I love all my lovely students who came to learn those cards from me.

Hope to get more creation done with Altenew and see you all soon here reading my blog posts.
Regards
neha


Saturday, May 18, 2019

Altenew Creative Watercolor Media

Hi Everyone,

Today I am here to show one more project for Altenew.  For this purpose I have selected another one of my favorite Class Creative watercolour Media. 

For this project I wanted to try and improve my coloring techniques by using the Altenew Watercolour Palette  and Altenew Water brush Pens.

 I have used the stamp sets Build-A-Flower: Anemone Coronaria and for the sentiment I chose my "happy" word from the Script Words 2. " for you" is from the halftone happy stamp set.


Basic Techniques and Process for making this Card:
  • For making this card , I have used the basic technique of masking.
  • First I planned how many flowers I want on the top and then stamped them randomly on my strathmore Watercolor Paper Cold press using distress ink Antique Linen.

  • Once I have got my top flowers I masked them with the flowers which I got by stamping them on a paper separately and fussy cutting them out as I wanted no white background in the flowers.
  • I have done the same techniques for the leaves as well and masked few to see the over lapping ones coming underneath the flowers.
  • After I was happy with my stamped images I started my coloring process.
  • Foremost I did a brown water wash outside my outline images. So spreading the brown outline with more water.
  • Then slowly and patiently I started doing every alternate petal at a time so that they are not wet as when I do the petal in between the two I did before. 


  • For the middle of the flowers I did black dots with watercolor.
  • For a bit of enhancement I also splattered some white with my brush.
  • My sentiment "happy" was cut two times on white card stock and 1 pcs in gold glitter card stock to have a raised effect.
  • "for you" I stamped with the Altenew New Antique Gold Pigment Ink on a black card stock.

Its amazing when you are challenged with something out of your comfort zone and try something new. I really would like to Thank Virginia and Erum for their support and love.

I look forward to create more and present myself more under their beautiful guidance.   

Hope you all like it.
Regards
Neha


Wednesday, May 1, 2019

Altenew Zentangle for Cardmakers

Zentangle for cardmaker! what an amazing class it was. I have done few cards before with zentangle but never had a chance to finish them. Few tips and tricks learned with Amber Davis at the Altenew Academy was just on spot to full fill all needs.

Today I created a card with Zentangle. For this Card I have used the Geometric landscape which is a new release from Altenew. As soon as I saw this stamp I thought this would be perfect to do some zentangle. Along with this stamp I have also used Altenew Henna Element set. 

So here I am with my card.


Here is the process on how I have created this card.

First I took a stamp from the Henna element and stamped them in a diagonal pattern on Nina Solar white along with its leaves. On a masking sheet I stamped flowers and leaves to cover the stamped images which I stamped on Nina solar white.


Now comes a bit of tricky part. The stamp was 6x6 so I had to bit struggle and expanding my lines with geometric pattern, I made a boo-boo but with Zentangle everything was hidden. 
First I stamped the 6x6 Image pattern and then I moved my paper little on right side so that I can stamp the 1/4 of the stamp again .Below is my picture which will show you what exactly I did.


All the lines which went missing from my this image I did create them when I started with  my zentangle on it.

Once everything was finished I managed to die cut my sentiment happy cutout 4 times on a back cardstock to layer them on top of each other and used "Birthday" from Birthday builder stamp set.
To finish it I just added few bits of sequins to add sparkle to finish.


Hope you all like my card and would love to join Amber for her beautiful class for some more fun and learning.


Untill next time. happy Blogging 
regards
neha

Wednesday, April 17, 2019

Altenew as Easy as ABC with Therese Calvird

An amazing month of April started with Altenew class in Melbourne with Tasnim and Therese. Finally I got to meet them in person.

Now coming to my second last lesson for AECP. For this lesson I took Therese Calvird class at the Academy called Easy as ABC. 

The Lesson was all about to make the best use of your Alphabet stamp and Dies. With the help of Therese Video here is what I have created.


For this card I have used Botanical You stamp set. And for making the best use of this stamp, I have used all the sentiments which were in this stamp set. Created my background with heat embossing. I have also used the layering word "you"  with heat embossing.


After finishing my heat embossing I have used Picket fence Blending brush to do my background . I have used the ink pads from Altenew which are lagoon, Volcano lake, and Mountain Mist.


After completing I die cut out my word 'You' from the base base cardstock as well as the leafy YOU with the help of the coordinating dies. I mounted the leafy YOU with the foam to give extra dimensions so that they look like popped out from the base.  


To finish my card I added a strip of sentiment heat embossed again on a black strip.

Hoping to finish my last lessons soon with my AECP.

Regards
neha


Wednesday, April 10, 2019

Watercolor Basics & Beyond using my watercolour Pan as Ink

Welcome back to my blog. 

Today, I am sharing another technique which I learned from Jennifer Rzasa. Absolutely amazing technique. In this one I have used my pan colours as my inks and spritzing with water before stamping. The results are really beautiful.

For this card , I used the stamp set called Dainty bouquet stamp. First taking the big stamp on my acrylic block  and using the teal colour along with the waterbrush pen I applied it on my stamps. TIP: make sure when you are lifting the colour it should not be watery otherwise it will get smudged when stamped therefore it should have lot of pigment in it.

Once I finished doing with my large one . I placed the big one in such a way that they look like one stem and did all the same step as the first one.

Once I applied the colour I sprayed a bit of water on it so that the dry colours are all reactivated.


Now with the layering of just the flowers I have used the second medium and darker teal from my ink pads to have their layers stamped on top of each other.


For my sentiments I have used it from Build-A- Flower camellia with a jet black ink. Also a bit of splatter with black was done to finish the card.

Hope you all like it. Don't forget to leave me some comments.
regards
neha


Tuesday, March 26, 2019

Creating background magic with Altenew Background stamps

I am once again back this month with my another step towards my AECP course Completion. 

Today I have created a card using the Altenew background Stamp Pinstripe. For this wonderful technique I would like to give credit to the awesome lady Laurel Beard for sharing her knowledge through her class about using background stamps in different forms. 

Here is my card.

For making this card I have used a piece of Vellum where I stamped with my Pinstrip Stamp using versafine and white embossing powered. Now here is a trick I rotated the same stamp 90 degree and stamped again using versamark and white embossing powder. ( Since it was already stamped and embossed once so i have few blank spaces in between which added extra features to it when I heat embossed it again.) 


Once the embossing is cooled down I used my Altenew Artist markers Mango Smootie and Ruby red on the embossed side of the vellum ( I know I have also used a blue but later on I did not like how blue turned so I cut that out from my final card view LOL ) . Once all colored I took rubbing alcohol in my spray bottle and sprayed onto the vellum which is why you can see in the picture it was bit curled. Then to get the final picture I trimmed out the blue and got this mat on a back cardstock to put them on a neenah solar white card base. 


For My sentiments I have cut out word happy ( Scripty word 2 ) on a foam and also on a white cardstock. And my birthday stamp is heat embossed with white from Birthday Builder Stamps.


Hope you all like the card. Please do not forget to leave me your beautiful comments.
Regards
neha

 photo oldswirl_zps9e8ffa8f.png