Showing posts with label Cutterbee. Show all posts

Thursday, December 28, 2017

DT Deni - Sweater Weather For Christmas

Can you believe Christmas is over and done with for another year already, it seems to come and go so quickly these days.. am I getting old or is it really happening... hahah.

Today I am sharing a blog post for Auzz Trinklets n Crafts, we are celebrating Christmas all month long, who wouldn't want to celebrate all month long anyway.. :-)


I have used a stamp from La La Land Crafts called Christmas Sweater Luka. He was such a cute image to colour up. I used my Copic Markers to colour him in this time around, I know I have started playing with my pencils lately but I will always be a Copic Girl.

I stamped the image on Mondi Color Copy 250GSM cardstock and stamped the image using Memento Tuxedo Black. I then coloured the image using Copic Markers which I will list below. I cut the image out using EK Success Cutterbee scissors and then used a Tombow Dual Ended Marker to edge the image. I added Wink Of Stella to a few sections of the image.

I cut a circle using My Favorite Things Die-namics Wonky Stitched Circle Stax using Red American Crafts Cardstock, I cut the sentiment strip using my Cutterpillar Pro Trimmer and then just snipped the edge using my Cutterbee Scissors.

I added the clear drops using Nuvo Crystal Drops - Morning Dew. Patterned paper is from American Crafts Hollyday 6x6 Paper Pad. All base layers are from American Crafts Cardstocks. The Card Base is from Twiddleybitz.

Products Used On This Card

Wink Of Stella Glitter Brush - Clear
EK Success - Cutterbee Scissors
Tombow Mono Multi Liquid Adhesive
Tombow Brush Marker
Cutterpillar Pro
Scotch ATG
Nuvo Crystal Drops - Morning Dew
American Crafts - Hollyday 6x6 Paper Pad
American Crafts Cardstock
Mondi Color Copy 250GSM
Twiddleybitz Card Base
Sizzix Big Shot
La La Land Crafts - Christmas Sweater Luka
My Favorite Things - Wonky Stitched Circle Stax

Copic Markers Used

E000, E00, E21, E11, E04, R20
E17, E47, E49
R27, R46, R89
G03, G07, G29
T0, T3, 0
C6, C8, C10
Y04, Y15
V09
B93, B95, B97, B99
BG02, BG05, BG07


I hope you have enjoyed my post today, if you have any questions feel free to send me a message or contact me via facebook (all links can be found below).


Thanks for stopping by, Deni

You Can find my cards for sale here https://www.facebook.com/angelhandmadepapercraft
My You Tube Here https://www.youtube.com/user/Denielle1983
My Blogs

http://angelhandmadepapercraft.blogspot.com.au/

http://auzztrinkletsnkrafts.blogspot.com.au/

Saturday, October 7, 2017

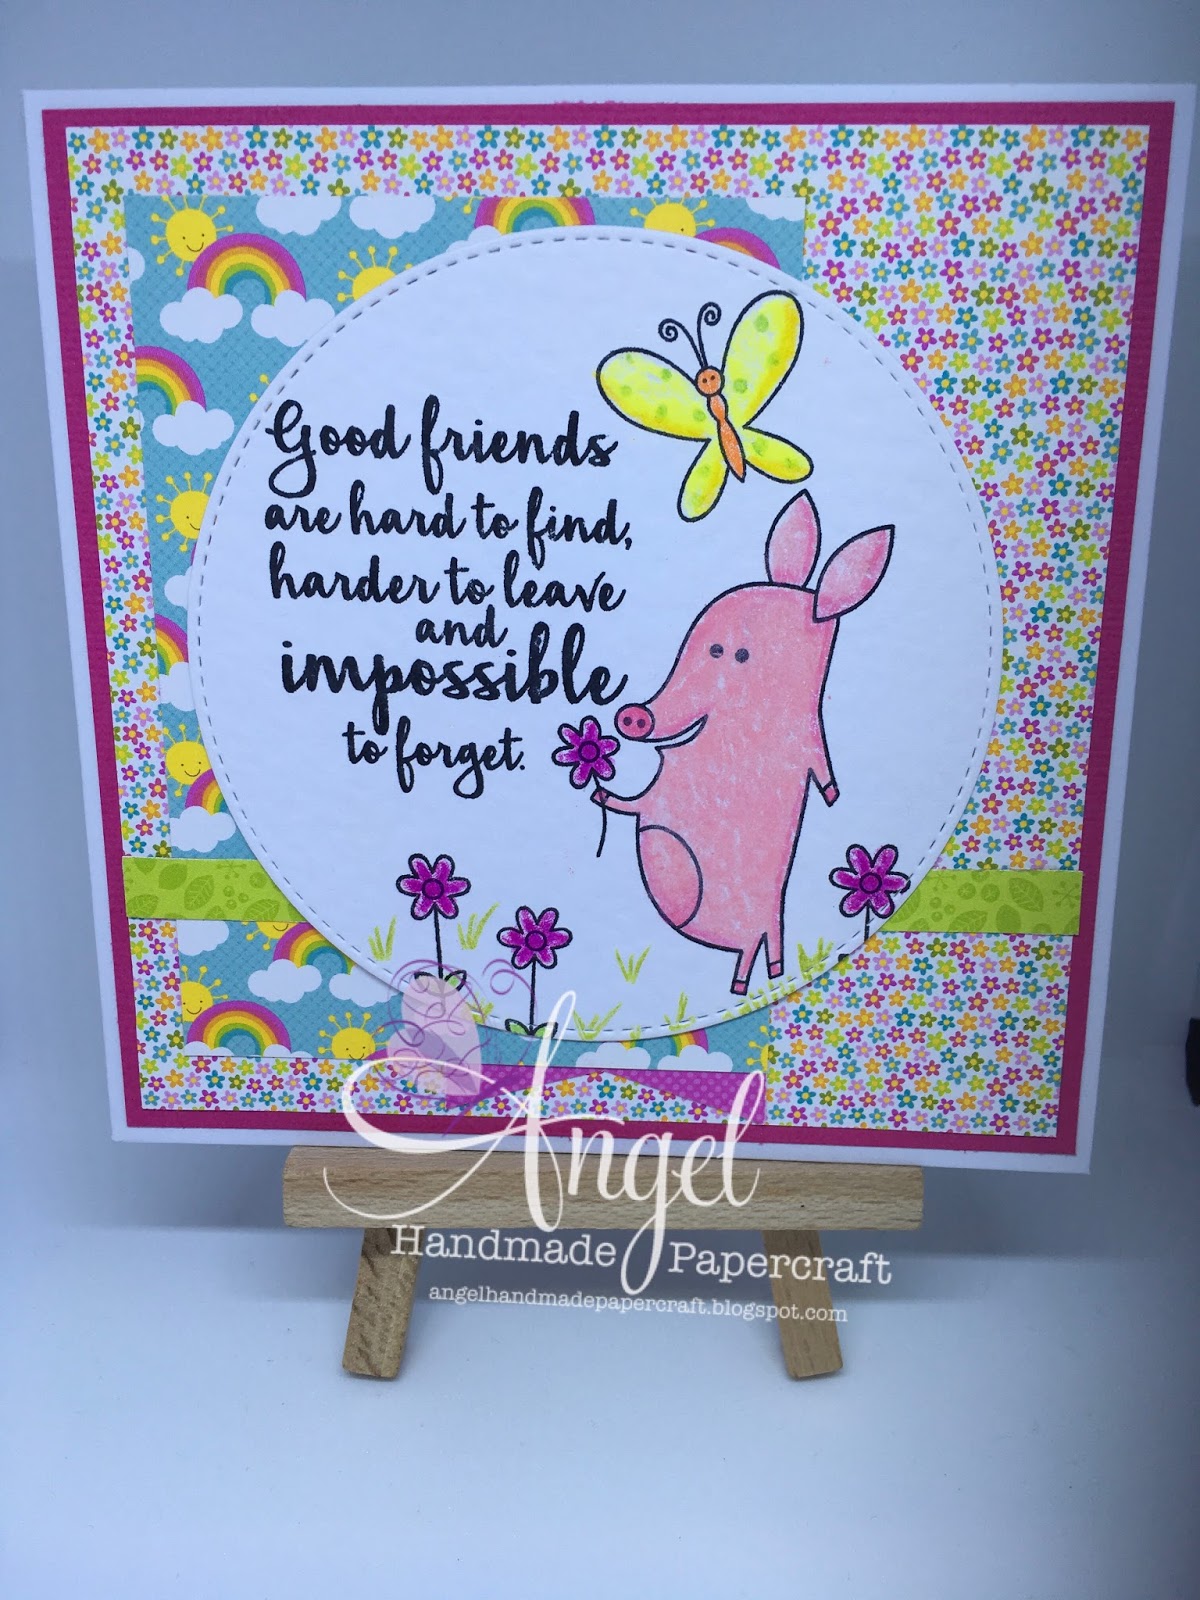
DT Deni Friendship and Rainbows

Hi Everyone DT Deni with you this morning.

This month we are working around "Rainbows".. I love rainbows but never seem to create with them, this one actually accidentally came together but i'm happy with it :-)

I also have a You Tube Video of the colouring process here.

I have used a stamp set from My Favorite Things which is new to me but not so new to the store called Much Cuteness.

I have also used Dovecraft Sentiment Stamps (purchased elsewhere)

Everything was inked up using Misti Stamping Tool and Memento Tuxedo Black. I have coloured the images using Prismacolor Pencils - all those will be listed at the bottom of my blog post. I didn't need to mask anything off as the stamps fit into my sentiments perfectly.

I cut them out using My Favorite Things Stitched Circle Stax and Rounded Rectangles. They were cut using Sizzix Big Shot.

I have adhered everything to Doodlebug Springtime 6x6 Pad using Scotch ATG.

I have created the flags using my Cutterbee scissors very carefully (they are super sharp) cutting the banner ends.

I have attached everything to a Twiddleybitz Card Base(no longer available for purchase).


Products Used On This Card

Dovecraft DCSTP097
Dovecraft DCSTP098
Doodlebug Springtime 6x6 Pad
My Favorite Things Much Cuteness
My Favorite Things - Stitched Circle Stax
My Favorite Things - Rounded Rectangles
Twiddleybitz Card Base
Cutterbee Scissors

Prismacolor Pencils
Colourless 
Blush Pink PC928
Pink PC929
Process Red PC994
Mulberry PC995
Lemon Yellow PC915
Sunburst Yellow PC917
Apple Green PC912
Limepeel PC1005


I hope you have enjoyed my post today, if you have any questions feel free to send me a message or contact me via facebook (all links can be found below).


Thanks for stopping by, Deni

You Can find my cards for sale here
My You Tube Here
My Blogs

http://angelhandmadepapercraft.blogspot.com.au/

http://auzztrinkletsnkrafts.blogspot.com.au/

Saturday, September 23, 2017

DT Deni - All About Men 3

Hi, DT Deni with you today.

What a beautiful day it was in a Sydney today, perfect day for washing the car and doing laundry.

I have created a male card today for. Little 2 year old boy, he is a little man in my life lol.


To start with I had a La La Land Crafts Super Hero Luka image on my desk from a previous colouring, he is available in Rubber and Digital Stamp.
I have cut the arrow, the bracket and the building scene from Club La La Land Crafts - January 2016 Kit. These products are now available separately, I will have the individual items linked below.

I have used Doodlebug Design Inc Day to Day 6x6 pad for the patterned paper and American Crafts Cardstock for the matting layers. All the layers have been adhered using Scotch ATG.

I cut the happy word die using W Plus 9 Happy Trio Die out of Canson Cardstock using Sizzix Big Shot and adhered it to the patterned papers using Tombow Mono Multi Liquid Adhesive. I adhered Luka to the patterned paper to start creating a scene. I have cut the Skyline Border Die, the Arrows and the bracket using Canson Cardstock and American Crafts Cardstock which I have adhered using the Tombow Mono Multi Liquid Adhesive.

I prepared some black cardstock using EK Success Powder Tool and stamped the word Birthday using My Favorite Things Adorable Elephants stamp set using Versamark Watermark Ink Pad, I then added Ranger Super Fine Detail white embossing Powder and melted it using my heat tool.

I have cut the number 2 using American Crafts Cardstock and I wrote the ND using Uniball Signo White Angelic Gel Pen, I then adhered everything.

I then added Wink Of Stella Clear Glitter Brush to the Arrow to finish off the card.

Lastly I adhered all the layers onto a Twiddleybitz Card Base using Scotch ATG, I did the same thing for the inside of the card.

I really hope you enjoyed my card today. All Products Used have been listed below, if you have any questions feel free to send me a message via Facebook.


Products Used On This Card

Sizzix Big Shot
La La Land Crafts - Super Hero Luka - Rubber
La La Land Crafts - Skyline Border Die
La La Land Crafts - Bracket & Arrows Die
W Plus 9 Happy Trio Die
My Favorite Things - Big Numbers
Wink Of Stella - Clear Glitter Brush
Canson Cardstock
American Crafts Cardstock
Cutterpillar Pro
EK Success Cutterbee Scissors
Doodlebug Design Inc - Day to Day 6x6 Pad
EK Success - Powder Tool
Lawn Fawn Acrylic Block
Versamark - Watermark Stamp Pad
Ranger Super Fine Detail Embossing Powder - White
My Favorite Things - Adorable Elephants
Uniball Signo White Angelic Gel Pen

Thanks For Stopping by and we hope to see you back here on the blog soon. Dont forget to stop by the ATC Shop to stock up on your crafting supplier.

Sunday, July 2, 2017

DT Deni - Play It To Your Strengths

Good Morning Everyone and welcome to July and Term 2 of our Design Team.

This month to break in the Design Team I thought i'd give the girls a chance to "Play to Your Strengths". So this is what we went with for our theme this month.

I decided my strengths were my Copics so I made a card using both my strengths and my weaknesses. I have never been much for using Distress Inks so I used those also.

I was finally able to get my hands on the "Mermazing" stamp and die sets from My Favorite Things in my last package from Auzz Trinklets N Crafts. I stamped the images using Memento Tuxedo Black in my Misti Stamping Tool, I coloured the gorgeous mermaid and the sea shell up using my Copic Markers and die cut them using the matching dies on my Sizzix Big Shot.


I decided to use the "Sending You Oceans Of Love" sentiment, so I grabbed some scraps of Canson Black cardstock that were sitting on my desk (which I prepped using an embossing buddy) and stamped it using Versamark Watermark Ink Pad and a Lawn Fawn Acrylic Block. I covered it in Wow Opaque Bright White (Superfine) Embossing Powder, Popped the excess back into the jar using some paper scrap that was on my desk. I then heated the Embossing Powder up using my Heat Tool and trimmed it to size using Tim Holtz 8.5" Trimmer from Tonic Studios. I cut the Flag end using my Cutterbee Scissors, I just cut a slip in the centre and met the corners to the middle creating the flag.

I hadn't really planned this card out like I normally would so at this stage I had no idea what I was doing haha.


I decided a blended background would be nice so I pulled out my Ranger Tim Holtz Embossing Inks and my Mini Ink Blending Tool. I used Tumbled Glass, Salty Ocean and Faded Jeans to blend on some Mondi Color Copy. I added some splashes of water using Ranger Mini Mister, which I lightly dabbed back off using paper towel.

I then cut a circle out of the blended piece using Stitched Circle Dies from Lawn Fawn. I attached the images and the sentiment to the circle using Tombow Mono Multi Liquid Adhesive and Scotch ATG.

Next was time to find some matching paper.. which I actually didn't end up doing.. I decided to make some to match.


I pulled out my Mermazing stamp set and My Favorite Things Hybrid Inks and started stamping onto Mondi Color Copy and creating a background paper. I used Sour Apple and Gumdrop Green. The paper still looked like it was missing something so I used the Avery Elle That Bites stamp set and grabbed the little bubbles image and added some of those in Black Licorice Hybrid Ink.

I cut a black square using Canson Cardstock and Lawn Fawn Stitched Squares dies on my Sizzix Big Shot, I then added the patterned paper using Scotch ATG and then added the circle (with images and sentiment attached) using Tombow Mono Multi Liquid Adhesive. I used some Mod Podge Dimensional Magic on the shell in her hair and the extra shell. I added Wink Of Stella Clear Glitter Brush to the Mermaid and added some sequins to the water.

Once all the layers were complete I added them to a pre-made Twiddleybitz card base using Scotch ATG. On the inside of the card I used another black stitched square from Canson cardstock. I added a strip of the leftover blended cardstock to the bottom, used left over images from my die cuts, stamped some of the plant images to the corner. I then stamped the sentiment to bottom to finish it off.


Products Used On This Card

My Favorite Things - Mermazing Stamps And Dies
Ranger Tim Holtz Distress Inks - Tumbled Glass, Salty Ocean, Faded Jeans
Ranger Mini Distress Blending Tool
My Favorite Things Hybrid Inks - Sour Apple, Gumdrop Green, Black Licorice
Memento - Tuxedo Black
Avery Elle - That Bites
Wow Embossing Powder - Opaque Bright White (superfine)
Ranger - Multi Medium Matte
Sequins- Stash
Mod Podge - Dimensional Magic
Universal Crafts - Ultrafine Tip Glue Applicator
Wink Of Stella - Clear Glitter Brush
Tim Holtz Tonic Studios - 8.5" Trimmer
Sizzix Big Shot
Lawn Fawn - Stitched Circles Dies
Ranger - Mini Mister
American Crafts - Cardstock
Mondi Color Copy 250gsm
Embossing Buddy
Tombow Mono Multi Liquid Adhesive
Cutterbee Scissors
Twiddleybitz Card Base
Pick Me Up Tool
Uniball Signo Angelic White

Copic Markers Used

E000, E00, E21, E11, E04, R20
E21, E23
Y11, Y13
R81, R83, R85

Thanks For Stopping By,

DT Deni

Sunday, June 18, 2017

DT Deni - June Stencils

Good Morning Everyone,

DT Deni with you today, we have been creating with Stencils this month, the girls have done such a great job with their projects and I am excited to share mine with you for the second time this month.


The stencil I have chosen to use today is from My Favorite Things and is called Stencil Star Grid.

I have done things a little backwards for my project today and found a stencil I wanted to use first and then went looking for stamps and things to use.


I received a rather large package from Auzz Trinklets N Crafts this past week and this stamp set I have used is from this package.. not very often I get to use a product so quickly.

What I wanted to show you in this picture is the big boo boo I made hahah. After I finished masking and stamping all my images I must have somehow got some ink on my hand, it was all over the side of my image, lucky I was able to re-diecut it using a smaller die.. but I still had a little on the right hand side of the card.. I used some Nuvo Crystal Drops in Black to try and hide it.. I'm sure my Dad probably won't even notice but since I am so critical on my own work it will drive me crazy :-)


Products Used On This Card

Altenew - Best Dad
Inkadinkadoo - Stamping Mask Paper
Ranger - Mini Distress Ink Pads - Candied Apple, Tumbled Glass and Chipped Sapphire
Ranger - Mini Distress Ink Blending Tool
My Favorite Things - Star Grid Stencil
Cutter Bee Scissors
Nuvo Crystal Drops - Gloss Ebony Black and Autumn Red
Red and White Ribbon - From Stash
Memento - Tuxedo Black
Misti Stamping Tool
Misti Grid Paper Pad
Magnets
Uniball Signo - White Gel Pen
Scotch ATG
Mondi Color Copy
Cutterpillar Pro

Copic Markers Used On This Project

R35, R37, R39
E04, E07, E08, E09
0, C1, C2, C3, C6
T4, T6, T8

I thankyou all for stopping by, don't forget to stop by the store (products are linked up where possible) to check out what other fantastic products Auzz Trinklets N Crafts Sell.

DT Deni

Sunday, May 14, 2017

May - Mother's Day DT Deni

Good Morning All,

With the month of May hitting its middle, we are enjoying celebrating our Mum's and Mum figures throughout the entire month.

I have created a card for a Special Mum using a stamp set from Newton's Nook called Raccoon Rascals, I thought about thinking outside the box instead of the usual flower image cards.


I stamped the image onto Mondi Color Copy (you can use X-Press it blending card or anything else Copic friendly), which is my go to Copic Paper using Memento Tuxedo Black and a Lawn Fawn Acrylic Block.

I fussy cut the image using Cutterbee Scissors, and inked around the edge using a double ended Tombow marker.

I stamped the word "Mum" using Lawn Fawn Jessie's ABC's and Memento Tuxedo Black.

I then started thinking about my card layout.. I found an almost finished paper pad in my stash from Prima called Bohemian Bamboo (an old stock item from Auzz Trinklets) and some thin cardboard which was from some packaging, i cut this up into a few sizes and started putting those layers together using Scotch ATG.

Next i decided i was going to add a big circle to my card using Lawn Fawn Stitched Circle dies, i attached the Raccoon's using Tombow Mono Multi Liquid Adhesive, then stamped the sentiment using MFT Simply Fab Sayings, I stamped this in my Misti as i knew because of the layers i would need to re-stamp the sentiment.

I added some Nuvo Drops to finish the card off and that's it ;-)

Thanks For stopping by and we hope to see you again soon.

Deni

Sunday, March 5, 2017

DT Deni - March Shades Of Green

Hi Everyone,

DT Deni here with you today on the Auzz Trinklets blog, this month we are playing with "All Shades Of Green". We didn't want to focus on St Pats Day so we thought why not think outside of the box.

Front of card 

Inside of card


I have created a card today using a stamp set from Newton's Nook called Magical Dreams. This is a pretty new company to me so I was quite excited to try them out. They are a clear stamp set which i love as it allows me to see exactly what and where I am stamping. You just attach them to an Acrylic Block/Misti or Stamp Press, stamp and ink away.


I attached the image to a Lawn Fawn Acrylic Block, inked the stamp up using Memento Tuxedo Black and stamped it onto some Mondi Color Copy 200gsm cardstock. I knew I was planning on Fussy Cutting the image so i just used some leftovers from another project.

I coloured the image up using Copic Markers (listed below) then coated the light green sections using Wink Of Stella Clear Glitter Brush. I then grabbed my Cutterbee Scissors (these scissors are perfect for fussy cutting) and fussy cut the image out.


My friend sent me some Sketches to have a play with as I've been in a bit of a creative slump at the moment, so that's what i was using while making this card - ill try and post a link if i can find where she got it from.
Next i went hunting through all my papers to find a few matching "Green" papers to make my card come to life. I found a 6x6 paper pad from American Crafts called Autumn Crisp which had exactly what i was looking for.


I cut a matt 12.5x12.5 matt from Green Cardstock in my leftovers tub (i actually cut two, one for the inside of the card also), I then cut a 12x12 matt from American Crafts white cardstock, and then a 11.5x11.5 square from the pattern paper. Cutting a matt inbetween the green and the pattern just breaks it up a little. I also cut a 11.5 square from another pattern paper from the paper pad and used the leftovers to cut the strip for the front of the card (i used the square on the inside)

I then grabbed my Lawn Fawn Stitched Circles (unsure whether i used the L or S as i have them altogether) and cut a circle from the Largest die from the inside of the green matt i cut earlier.. I used the matt as i knew it would not show from under the white layer and meant i got more use out of all my papers. I then used the next size down circle die to cut a white layer. I used more leftovers out of my tub for this layer.
Next I grabbed some leftover black cardstock, used my Powder Tool to remove the static and using a small Acrylic Block from Lawn Fawn and Versamark Watermark ink pad i used one of the sentiments from the stamp set, Superfine White Embossing Powder from Wow and then heated it up using my heat gun. I then used my trimmer to cut it into a thin strip for the front of my card.


This is now where I wasn't sure what I was going to do, as sitting all the layers together it just seemed like it was missing something. I decided to use the magic wand and the potion bottle to stamp the background of the white circle I had cut (using Memento Tuxedo Black). I then used a little grey Copic Marker to add some shading to the potion bottles.

The card still needed a little something more.. so I added some Nuvo Crystal Drops to finish the card off... Now here is where I made a big mistake.. Silly me decided to work on the inside of my card and accidentally knocked it completely open and made all my drops flat lol... so I carefully used my piercing tool to scrape them up and redo them.. So please be careful and make sure they are completely dry before opening your card.


Products Used On This Card

Wink Of Stella Clear
Copic Markers
Newton's Nook - Magical Dreams
Lawn Fawn Acrylic Block
Mondi Color Copy 200gsm
Lawn Fawn Stitched Circles
American Crafts Cardstock
American Crafts - Autum Crisp 6x6
Versamark - Watermark Ink Pad
Memento Tuxedo Black
Powder Tool
Cutterbee Scissors
Nuvo Crystal Drops - Apple Green, Bottle Green, Woodland Green

Copic Markers Used

C0, C1
YG25, G24, G28
YG03, YG05, YG07

Sunday, February 19, 2017

DT Deni Love and Romance

Hi All,

DT Deni with you today. I have a card using a stamp set from Avery Elle

It is the month of love and Romance and I have created a Valentine's Card for my Boyfriend, this is our second Valentine's Day together and he certainly appreciates my cards, I am very grateful for that :-)


I have stamped the image onto Mondi Color Copy 200gsm using Memento Tuxedo Black.
I have cut two circles from Lawn Fawn Stitched Circles (unsure what size as I have all of mine in the same pack together) using my Sizzix Big Shot.

I have coloured the image up using Copic Markers (You can see a list of the markers below) I have fussy cut the image out using Cutterbee Scissors - which I have just recently purchased and absolutely love.


I cut a piece of American Crafts Black Cardstock which I treated using an embossing buddy and using an My Favorite Things Stamp Set called Love You More I inked it up using Versamark Watermark Ink stamped it then added some Ranger Gold Embossing Powder and heated it using my Heat Gun.


Bella Wedding was my paper choice for this card, I have had this in my stash for quite a long time, so have actually been using it on the last few cards. I cut the banner using a stitched banner die from My Favorite Things.

I cut some mats from other American Crafts Cardstocks and added all the layers to a Twiddleybitz Card Base using my Scotch ATG.

I then added everything onto the card and it is complete.


Products Used On This Card
Cutterbee Scissors
Cutterpillar Pro
Sizzix Big Shot
Tombow Mono Multi Liquid Adhesive
Scotch ATG
American Crafts Cardstock
Lawn Fawn Stitched Circles Dies
Versamark Watermark Ink Pad
Embossing Buddy
Twiddleybitz Card Base
MFT Love You More
Bella! Wedding


Copic Markers Used
YR21, YR24, YR27
E000, E00, E21, E11, E04, R20
B93, B95, B97, B99
C6, C8, C10
R35, R37, R39

Thanks For Stopping by,

DT Deni
 photo oldswirl_zps9e8ffa8f.png