Showing posts with label flowers. Show all posts

Wednesday, May 3, 2017

DT Teresa - Shabby Chic 2

Hello! 

I have another shabby chic project to share with you today, catching up now! 

This card uses Neenah Classic Crest 110lb Smooth Solar White Cardstock for the base which is cut with a paper trimmer at 4 1/4" x 11" and scored with a teflon bone folder at 5 1/2" to make a top folding card of 5 1/2" x 4 1/4".

I used the scalloped frame from My Favorite Things Blueprints 20 to place on the card base, moving it slightly above the fold of the card to create a top folding scalloped base card once it was run through the Sizzix Bigshot. I then used the same frame die to cut a piece from Simon Says Stamp cardstock in Audrey Blue and adhered this to the partially scalloped card base. This covered the top fold of the card base - as the frame die was moved above the card base before cutting to retain the fold, the edge was flat. Using the coloured cardstock allowed the opportunity for a complete scalloped card front. Using Versamark Ink, I stamped a floral image from The Ton Fresh Cut Dahlias stamp set numerous times onto the card, providing a subtle background.
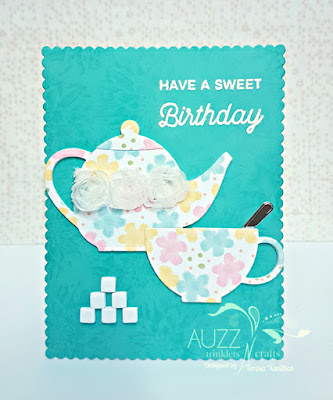


I used Neenah Classic Crest 80lb Smooth Solar White Cardstock and stamped various images from Hero arts Color Layering Bird and Branch and WPlus9 Fresh Cut Florals to create my own patterned cardstock piece. Altenew Inks provided a wonderful feminine, pastel pallet using Frosty Pink, Buttercream, Frayed Leaf and Peach Perfect. From this I cut a teapot, teapot lid and teacup from My Favorite Things Dienamics Tea Party and placed aside. 

I then die cut multiple (7-8) tea pots, lids, teacups and (42-48) sugar cubes with the dies from plain white cardstock and adhered the pieces together using Ranger Multi Medium Matte to make sturdy embellishments. Before adding the top stamped piece of the tea pot lid and tea cup I cut away a small area of the plain adhered pieces with my Tim Holtz scissors to allow the pieces to sit flush over the top of the teapot. I then added the top piece and glued the teapot, lid, cup and sugar cubes into place using Ranger Ink Multi Medium Matte.


After brushing over the area to be stamped with an EK Tools powder tool, the sentiment stamp from My Favorite Things Cookie Crumbs was cut apart and stamped in Versamark Ink with my MISTI stamping tool. I used Hero Arts white embossing powder for a stand out sentiment, paired with a Wagner Heat Tool.

I die cut a spoon with My Favorite Things Dienamics Tea Party from a silver foiled piece a had previously made from Heidi Swapp Minc Reactive Foil using a Heidi Swapp Minc Machine. I cut away the lower half of the spoon and placed the handle section against the top of the teacup, adhering it to the card base and giving the illusion of it sitting inside the cup.

The sugar cubes were then swiped with the wonderful Zig Wink of Stella in Clear to provide a shimmer and a sparkle! Finally, I placed some lovely fabric flowers onto the teapot. An elegant, feminine card is the result and would make a great Mother's Day card also.


Thankyou for following along with me today. Please feel free to ask questions if anything needs clarifying. If you cannot find the items I have used (listed below) in the Auzz Trinklets and Crafts store, be sure to drop Neha a message via email or Facebook and she will do what she can to order the product in for you.

Happy crafting and have a great day!


Teresa


Products used:

Neenah Classic Crest 110lb Smooth Solar White Cardstock
Paper trimmer
My Favorite Things Blueprints 20
Sizzix Bigshot Machine
Simon Says Stamp cardstock in Audrey Blue
Versamark Ink
Neenah Classic Crest 80lb Smooth Solar White Cardstock
Hero Arts Color Layering Bird and Branch
WPlus9 Fresh Cut Florals
My Favorite Things Cookie Crumbs
Wagner Heat Tool
Heidi Swapp Minc Machine
Zig Wink of Stella in Clear
Fabric flowers

Tuesday, May 2, 2017

DT Teresa - Shabby Chic

Hello!


I want to apologise for not sharing my April projects with you until now. The month was a difficult one for my family as my beautiful mother-in-law sadly passed away, suddenly, and it was not possible to find the time, inclination or energy to craft.

The project I am sharing today is very different from my usual creations. I found myself looking through the Auzz Trinklets and Crafts store for products that hit me with their shabby chic-ness. 


I took a 20cm x 20cm canvas and covered it with Ranger/Dina Wakley Media Gesso in white and allowed it to dry. I have not tried napkin art before, but was keen to give it a go and found the perfect napkin for a shabby chic project - a parisian themed ballerina displayed with a music manuscript - perfect! I separated the layers of the napkin and kept only the top sheet with the image to use on the canvas. I tore away the section of the napkin that I wished to use and carefully cut around the ballerina's legs. I used a PVA glue to adhere the napkin, brushing the glue directly onto the canvas and on top of the image. I would thoroughly recommend using a decoupage glueas it designed specifically for this and I plan to use this in the future. The PVA seemed not quite right for such a delicate paper. Again, I allowed this to dry before continuing with my project.


I love The Crafter's Workshop stencil Mini Cherry Blossoms and I paired this with Ranger Texture Paste, coloured with a few drops of Ranger Distress Ink in Cracked Pistachio. I placed the stencil in the bottom left corner of the canvas and applied the coloured texture paste to bottom half of the stencil. I removed the stencil, cleaned it off with a baby wipe and then moved it to the top right of the canvas and applied more texture paste to the area. Although the stencil is smaller than the canvas, once the middle of the canvas is covered with other items, it gives the illusion that the stencilled image is continuous. This also was given time to dry. (Yes, I needed to be very patient creating this canvas!)


I cut up some small pieces of Burlap Fringe in Sand and adhered these to the canvas with my favourite adhesive, Ranger Multi Medium Matte. My favourite, as it dries clear and leaves no evidence of its presence; no shine, so it doesn't matter if it happens to ooze out from the sides of the object you are adhering.


I then arranged paper flowers onto the canvas that have been in my stash for a considerable length of time, so this was a great opportunity to use them. You can find a beautiful range of flowers in the Auzz Trinklets and Crafts store here


The butterfly wings and Eiffel Tower embellishments were from my stash, as was the frame sticker around the lovely sentiment which comes from the Stampers Anonymous/Tim Holtz stamp set, Urban Chic.

To complete the canvas, I took a sponge finger dauber and applied Tsukineko Golden Glitz ink to the entire canvas, apart from the inside of the framed sentiment.


Thankyou for following along with me today. Please feel free to ask questions if anything needs clarifying. If you cannot find the items I have used (listed below) in the Auzz Trinklets and Crafts store, be sure to drop Neha a message via email or Facebook and she will do what she can to order the product in for you.

Happy crafting and have a great day!


Teresa


Products used:

Canvas 20cm x 20 cm
Ranger Ink/Dina Wakley Media Gesso (white)
Napkin - Ballet Paris
PVA glue
Sospeso Transparente - Decoupage Glue (recommended)
The Crafter's Workshop stencil - Mini Cherry Blossoms
Ranger Ink Texture Paste
Ranger Ink Distress Ink - Cracked Pistachio
Burlap Fringe - Sand
Ranger Ink Multi Medium Matte
Paper Flowers
Embellishments - butterfly wings, Eiffel Tower, frame sticker
Stampers Anonymous/Tim Holtz stamp set - Urban Chic
Tsukineko Sponge Finger Dauber
Tsukineko Golden Glitz ink pad


Friday, February 10, 2017

DT Clarinda - Romance

Hi Everyone!!
DT Clarinda here. *waves*  I just want to take this opportunity to say a huge thank you to Denielle for posting my last two posts for me whilst I was away on vacation. I am back now and looking forward to being able to share lots of creations with you.

This months theme is romance, so I have created a lovely little shaker card for valentine' s day. 


This is a photo of the items I used to create the card.  I will make a list below.

Firstly I stamped the Gorjuss image onto some blending paper that I had cut to 10cm square and used copics to colour the image.


I then created the box frame using my scoring board and a piece of white card stock cut 11.5cm square. I cut in diagonally from the corners approx. 1 cm and scored two lines. Fold the card on the scoring lines and stick the image to the base of the frame (if it is a bit tight, just trim it down). 

Then add your shaker items, and cut a piece of acetate to fit on top and secure with double sided tape or glue.


Using a stanley knife and metal ruler, I cut out a frame from red card stock. This I embossed with hearts, rounded the corners and inked the edges. Attach on top of the acetate. I used a white and a pink Kirarina Wink pen to colour odd hearts to help them stand out a bit.


I then cut white cardstock to twice the length, scored and folded that, and rounded off the corners. Glue the frame to the white card being careful to line it up so the frame is sitting to the edge of the card.
Add ribbon around the edge to hide the gaps. Add greeting and flowers to suit.


Inside was very simple, I just layered a white die cut piece of card on top of a red die cut piece of card and stamped with a matching sentiment.


I hope you have enjoyed seeing my creation. Below is a list of the products I have used. Many of these are available to purchase from Auzz Trinklets n Krafts or can be ordered in by Neha.

Thank you for visiting.

Clarinda xx

Tools:
  • Big shot 
  • Cuttlebug heart embossing folder
  • Tim holts scissors (medium and small) (love these and have multiple pairs - best scissors available in my opinion :) )
  • Stanley knife and metal ruler (I don't use paper trimmers)
  • Small scoring board
  • Corner rounder
  • Scotch tape glider (I love this tool and it's big enough that I don't lose it)
  • Acrylic blocks for stamps.
  • Gorjuss stamp - the scarf.
  • Sentiment stamps. 
  • Stitched rectangular die set. (I cut the rectangles then adjusted the paper and sent them through a second time to get squares)
Consumables:
  • Tacky glue
  • Fast drying glue with precision tip
  • Memento ink
  • Distress ink (barn door)
  • Heart shaped confetti
  • Assorted flowers
  • White blending paper
  • White and red cardstock
  • Kirarina Wink pens
  • White sharpie pen
Copic colours:
  • E -  0000, 000, 11, 21, 23, 31, 34, 35, 37, 39, 41, 50, 53
  • W - 3, 5, 7
  • BG - 70, 72, 75, 78
  • Colourless blender


Wednesday, January 25, 2017

DT Teresa – All About the Girls 2!

Hello! Today I am sharing my second project for January with the theme All About the Girls.

When I ordered the Honey Bee stamp set Little Pickup from Neha, I knew I had to create with it right away! It kind of screams to be used on a card for a bloke, but the set itself is so versatile with all the sweet additions you can have loaded into the back of the ute. I figured that pink and frills are not for all girls…but (I think) most of us like to receive flowers!

There are words from the Honey Bee Sending You Sentiments stamp set that coordinate with this set which can be used for a celebration, a get well, a heads up on a change of address and on an occasion when you want to lift someone’s spirits.


This card uses Neenah Classic Crest 110lb Smooth Solar White Paper for the base which is cut at 4 ¼“ x 11” and scored at 5 ½“ to make a side folding card of 5 ½“ x 4 ¼”.

I applied Tumbled Glass and Broken China Ranger Distress Inks directly to the top half of the card base with a Ranger Mini Ink Blending Tool to create a sky back ground. I coloured the area in Peeled Paint Ranger Distress Ink that would be seen behind the track.

The hills with tree trunks were die cut with the Lawn Fawn Lawn Cuts Stitched Tree Borders and I also used the coordinating Lawn Fawn Lawn Cuts Grassy Hillside Borders for the foreground of the scene. These pieces were coloured with Shabby Shutters and Peeled Paint Ranger Distress Ink as were the green leaf pieces for the trees. I coloured the tree trunks with a Ranger Distress marker in Gathered Twigs.


On each piece – the sky, hill and two layers of grass, I squirted water using my Ranger Distress Sprayer which left the splotchy texture.

I took the first layering piece with the trees and die cut a track into it for the ute (pickup truck) to move along. The Lawn Fawn Lawn Cuts Slide On Over set also coordinates, however I wanted the track to be a little longer than the die would allow. I placed the piece into the Sizzix Bigshot so that the right side of the die was hanging outside the sandwich of the plates so that it would not be cut.

Please excuse the state of the plates!


 I then flipped the die around and matched it up with the cut piece and again ensured that the die would not cut at that end by leaving it outside the plates. This enabled me to have a longer track along the card.


Again, please excuse the state of the plates!!

I stamped the ute and flowers from Honey Bee Stamps Little Pickup with my MISTI stamping tool in Memento Tuxedo black ink onto X-Press It Blending Card and coloured the ute and flowers with Copic markers. The flowers and ute were then diecut using the coordinating Honey Bee Little Pickup dies.

I chose 'a little pickup' sentiment from Honey Bee Stamps Sending You Sentiments and stamped in Versamark ink using the MISTI stamping tool to assist with placement and embossed with Hero Arts white embossing powder using the Wagner heat tool.


As the ute is a large image, I cut four cardstock discs with the My Favorite Things Surf and Turf dies so that I could secure it in two places. I glued a My Favorite Things Spin & Slide Disc onto two of the cardstock discs with Ranger Multi Medium matte and placed them into the tracks underneath so the Spin & Slide discs were facing up. The other cardstock discs were then adhered onto the other side of the Spin & Slide discs. At this point, both ran freely along the track. I placed them apart so the ute could then be glued to the discs in a sturdy position.

I then adhered this layer to the card base using 3M Scotch Double-Sided Foam Tape and used it also to adhere the first layer of grass in order to give the ute clearance to move along the track. I adhered the final piece directly using Ranger Multi Medium matte and added the single flowers along the bottom of the card.

I finished off the card by diecutting three of the 'Sending you' sentiment from Honey Bee Stamps Sending You Sentiments die set from white cardstock and layered them together, adhering the words to the card base using Ranger Multi Medium matte. With a lick of Zig A Wink of Stella in clear over the sentiment, the card was complete.


Thankyou for following along with me today; please feel free to ask questions if anything needs clarifying. If you cannot find the items I have used (listed below) in the Auzz Trinklets and Crafts store, be sure to drop Neha a message via email or Facebook and she will do what she can to order the product in for you.
Happy crafting and have a great day! 


Products:

Neenah Classic Crest 110lb Smooth Solar White Paper
Tumbled Glass Ranger Distress Ink Pad
Broken China Ranger Distress Ink Pad
Peeled Paint Ranger Distress Ink Pad
Shabby Shutters Ranger Distress Ink Pad
Lawn Fawn Lawn Cuts Stitched Tree Borders
Lawn Fawn Lawn Cuts Grassy Hillside Borders
Gathered Twigs Ranger Distress marker
Ranger Distress Sprayer
Lawn Fawn Lawn Cuts Slide On Over
Sizzix Bigshot
Little Pickup stamps - Honey Bee Stamps
MISTI stamping tool
Copic markers – R02, R14, R24, N0, C0, C1, C4, W5, W7, YR15,                               YG23, Y06
Honey Bee Stamps Little Pickup dies
Honey Bee Stamps Sending You Sentiments
Versamark ink pad
Hero Arts white embossing powder
Wagner heat tool
My Favorite Things Dienamics Surf and Turf
My Favorite Things Dienamics Spin & Slide Discs
3M Scotch Double-Sided Foam Tape
Honey Bee Stamps Sending You Sentiments die set
Zig Wink of Stella - Clear Glitter marker

Sunday, October 26, 2014

Sunday fun day emblishment making technique 5

Hello everyone .

Another tutorial on making burlap flowers.

 This video on burlap flower done by Cool2carft in her you tube channel.


Hope you all will have fun and enjoy ...

Don't forget to follow our blogs for regular techniques and other DT projects.


Thanks


DT-Neha

Thursday, October 16, 2014

Second DT project for Southern Girls Challenge Theme " Words "

Hello Everyone 

Here is my second post for DT project for Southern Girls Challenge .

This time we have been given a theme on "WORDS " and i really enjoyed doing a mixed media Canvas for it . 

So here is my take for it :


Materials Used for this Project :
Kaiser craft Paper for the background, Birdcage ,  artifical birds , artifical moss , leaves and grasses , I have got my quotation printed on the Cameo designing software and got it cut on the white Vinyl. also got one small quotation stamped and cut on the sides of the bird cage . 

I have also used two chipboard words on the side of the canvas. 
And last but not the least my Sospeso Trasparente work which I really enjoy putting where ever I can and its fun and very easy technique to follow.

Hope you all like it 
Thanks
Neha


 photo oldswirl_zps9e8ffa8f.png